


What is a reverse proxy in the first place?
In layman's terms, it is a middleman sitting between two parties to make transactions between them smoother, faster, and more secure. Think of a waiter in a busy restaurant. The job of a waiter is to take orders from you and pass them to the kitchen staff and when your order is ready, serve the food from the kitchen to your table. As you can tell, you really don’t have to do much at a restaurant. All the hard work of communication and serving the food is handled by the waiter, here the waiter is acting as a middleman or reverse proxy between you and the chef.
If we apply this analogy to the digital world, a reverse proxy is a server between your clients (browser, mobile app etc.) and web servers. It can intercept the requests from the client before it reaches the server. This in turn opens a lot of opportunities for improving web server’s characteristics. Just as the waiter in a restaurant takes orders and serves food. It also takes care of billing and payments, managing multiple customers at the same time, managing crow during rush hours etc. A reverse proxy server can also do similar tasks in the internet world like balancing traffic between multiple servers, mitigating risky behaviors, and caching the responses for the same queries.

But, our goal for using a reverse proxy is different. We want to perform redirects between our websites. In this case, I’ve three websites
a. Main landing page which I want to point to kanvasai.com
b. Medium integration page which I want to point to kanvasai.com/medium followed by my app’s query parameters like _?utm_source=&page=_
C. Dev. to integration page again kanvasai.com/devto followed by my app’s query parameters like _?utm_source=&page=`_

For the sake of brevity all there websites are hosted on webflow.io and these are records on my GoDaddy DNS.

Notice, that I created three records (main, medium, devto) with CNAME pointing to a non-ssl server of webflow (Usually, we use `proxy-ssl.webflow.com). I'll explain later why.
This gives me three websites with three different subdomains under one domain.
💡 However, an interesting thing to note here is all the web crawlers and robots treat all these three websites as a different entity hence, this hurts the SEO significantly and results in a ranking drop.
So, how do we fix it such that when any crawler/user tries to access the
Let’s find out how CloudFlare workers can help
Workers are just javascript code running in Chrome browser environment. The good thing is that it runs closer to your user's browsers. The bad thing is that you cannot use node packages like in Serverless functions but all modern browsers APIs are supported. Read more about them here.
Disclaimer : This article assumes you know little bit about cloudflare workers and have tried building with it. So, basic stuff will be excluded and maybe hyperlinked to other blogs.
Note : If you’re going to apply this technique on production apps, please note that every
CNAMErecord will be intercepted by worker, hence needs to be handled with correct worker logic for every route.
Prerequisite :
working CloudFlare account (free tier also works for this tutorial),
access to your domain registrar (in this case I’m using Godaddy but the process is the same for every other DNS providers),
Any code editor that supports JS/TS language features(I will use VS code),
Step 1 : Create a worker project with Cloudflare cli
Create a new worker project by running the following command in the terminal. website-stitcher is the project name
npm create cloudflare@2 -- website-stitcher
After running this command, CLI will create a directory named web-stitcher and you’ll be prompted through a series of questions,
- choose hello world worker

b. Always say yes to typescript

c. git version control (you can do this later also)

d. Yes, deploy our sample worker.

After selecting ‘yes’, Cloudflare cli will try to log in to your Cloudflare account via browser. Authorize the authentication of cli with the account.

and Voila! we have our Cloudflare worker ready and deployed. (A browser window should open up automatically with the message ‘hello world’)

Now, we have a Cloudflare worker boilerplate code ready. Open it in your editor of choice. We don’t need to worry about all the files now. We’ll write all our logic in src/worker.ts file

Step 2: Write the logic to handle incoming requests and redirect its response
The fetch function has access to the request object which we will use to identify domains, subdomains, pathname, search params, etc. using the below snippet.

Let’s define our constants ROOT_DOMAIN, SUBDOMAINS, MAIN_SUBDOMAIN and main WEBSITE_URL.

Now, we need to write js/ts code to check the incoming hostname for subdomains and redirect it to sub- route. Something like this,

By looking at the test cases we can break down the logic into three main blocks
If the hostname is not the same as the ROOT_DOMAIN
here, we need to check SUBDOMAINS if they match the hostname’s subdomain. If it matches one of the SUBDOMAINS we need to redirect the user to the right url.
we should also check if it matches our MAIN_SUBDOMAIN and redirect the user to the main website
If does not meet the above two conditions then just return data from the original request URL.
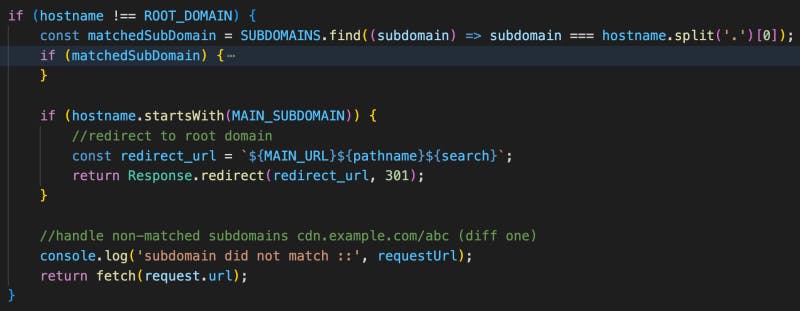
If the pathname matches one of the SUBDOMAINS and the hostname is the same as ROOT_DOMAIN
here, we just need to fetch the data from the matching subdomain and redirect the user to the correct URL.

or if there’s no subdomain or subroute, fetch data from MAIN_DOMAIN and return a response or redirect the user.

If the pathname has a trailing
slash(important case)SEO crawlers treat
kanvasai.com/medium and [kanvasi.com/medium](http://kanvasi.com/medium/) as separate routes. Hence, we need to take care of thetrailing slash`. It’s easy with a bunch of js string methods.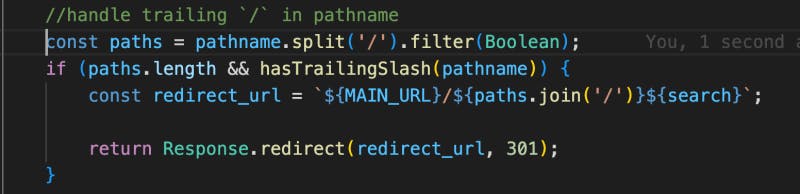
It took some time and hit and trial to come up with logic and could be a little overwhelming to understand at once. Hence, I’m attaching a flow diagram to visualize the conditions.
If you prefer you can just copy and paste the same code change values of constants ROOT_DOMAIN, SUBDOMAINS, MAIN_SUBDOMAIN, and main MAIN_URL to your records.

The complete code looks like this
Run the following command to deploy the code/worker
npx wrangler deploy
Head over to the Cloudflare dashboard > workers & pages. You should see list of all the workers here. I have multiple workers but if it’s a new account you should see just one worker.

Navigate inside your worker by clicking on it. You can see all relevant information related to your worker. There are tabs like triggers, logs, deployments, etc.
Next, we need to define the trigger for this worker. Right now, it is deployed to some random URL by Cloudflare.
Step 3: Register your site with Cloudflare zone
Before adding a trigger for our worker we need to delegate our DNS nameserver to Cloudflare. (If your DNS registrar is Cloudflare you don’t need to do this step).
On the main dashboard, click Add Site button on the top right corner, and enter your domain name ex. kanvasai.com.
Now, follow the steps shown by Cloudflare for moving nameservers. This will allow Cloudflare to fetch all the existing DNS records. But, please make sure you have all the records present.

Adding albert.ns.clouflare.com and annabel.ns.cloudflare.com to my goDaddy domain DNS setting page.

Finish the site setup by clicking continue and check the DNS nameserver status. This may take some time to verify new nameservers. Important, thing to note here is now you have to manage all your DNS records from your Cloudflare account. Your DNS registrar will not have control over your records.’

Note : Make sure you have all the records available in the cloudflare DNS records too. In my case, my two records were not transferred so I had to add them again manually. This can cause downtime to your app so be careful while doing this transfer.
Step 4: Add your root domain as the worker’s trigger
Now, we are ready to add triggers to our workers. Navigate to your worker by clicking workers & pages on the left panel and then clicking on your worker from the list.
On this page, click on the Triggers tab next to Metrics. Here, click on the Add Custom Domain button and add your domain.

Note: you might see this error if you did not follow the last step correctly. In order to add your custom domain as a trigger for workers, your custom domain must be delegated to Cloudflare nameservers.(Don’t worry, your registrar will stay the same, GoDaddy in this case).
Cloudflare adds a new DNS record to type worker, you can check this to verify if your custom domain is set up correctly.

Step 5: Attach a wildcard route to your worker
Now, for our worker logic to run correctly we need to forward all the requests from all the subdomains to our worker. So, we’ll add a route for this we are going to use a wildcard () to define a pattern of URLs that are allowed or that trigger our worker. So, just below the custom domain, there is a section for routes (also called worker routes). I’ll add *.kanvasai.com/* as the route and choose kanvasi.com as the zone. This represents all the subdomains and subroutes that have kanvasi.com as the root domain.

We should see this message once the route is properly configured.

Now, we can already see the worker in action. Try visiting your root domain and subdomains.

If it's not working for you wait for some time to let DNS propagate changes. Try on a different device because Chrome caches the websites on disk.
Step 6: Handling www CNAME record :
There are a couple of ways to handle this,
We can add another CNAME record pointing to the same Cloudflare worker,
handle it in the worker code with JS or,
iii. Define a page rule such that anyone accessing kanvasai.com* gets automatically redirected to kanvasai.com*

Step 7: Handling relative URL (hrefs) in your applications
If your app uses an anchor tag and has subroutes, you should probably prefix those with subdomain names (/medium/about or /devto/about). You’ll understand why after trying it.
Step 8: SSL/TLS certificates between Cloudflare and your application server
For Vercel and similar applications, SSL is generated by the platform itself. Hence, we need full security
For Webflow, we keep it flexible and let Cloudflare manage SSL certificates.

Cons of this approach
Now, we’ll have to manage all our DNS records through Cloudflare.
Adding a new record becomes a little tricky.
In the follow-up article, we’ll see how to do this with SPAs. Please comment if you want a tutorial on that topic.
If you are trying to setup this reverse proxy and facing any issues, feel free to reach out or book a free consultation here. I’m happy to help.
This article was published using Buzpen. If you want to publish the same article to three major platforms at once, then do try out Buzpen.